


Continuing our Rooting Tips series, here are some random tips on selecting, ordering and prepping fig cuttings.
☀️ Mother tree health and cutting quality can significantly impact your success at rooting. Things like method used to clean cuttings, storage, weather conditions the cutting was subjected to, etc. can all affect if a cutting will root or not. Usually, the fresher the cutting, the better the success. That said, fig cuttings are very easy to root generally and so even seemingly poorer quality cuttings can root just fine in the end. Don’t despair & don’t stress over this aspect, but be choosy with your sources. Keep in mind that you are dealing with natural materials and so cuttings can vary in quality & looks even from the best of sellers.
☀️ You will hear the term “lignified” when buying cuttings. Lignin comes from Latin lignum and means wood. It is what makes wood woody. Lignin is what gives wood its rigidity by adding strength & stiffness to plant cell walls. It also waterproofs the cell wall, which helps with the upward transportation of water in the xylem tissues. Lignan has antifungal properties as well and does not rot easily.
A lignified cutting has hardened on its outer tissues and started to form the bark. So, it has gone from green, tender tissue to hardened, brown tissue.


☀️ If you need to store your cuttings for a while before rooting, make sure to buy dormant & lignified (hardwood) cuttings. Non-dormant and semi-lignified (semi-hardwood) cuttings are okay if you can root them right away, do not store these. Non-dormant cuttings root the best as they are fully hydrated & activated for growth. Green, unlignified cuttings (softwood) are the most challenging to root, but can be successful for some. These need to be rooted immediately. Managing humidity is most important with green cuttings.
*Note that even lignified cuttings can have a greenish underneath color, especially when wet, this is not what we are referring to when we say “green” cuttings. A green cutting refers to new growth that has not fully hardened yet and is bright green all over, with little to no brown hazing at all. They are very tender and can even be floppy or wilty at the tips when removed from the tree.


☀️ You can often tell if a cutting was dormant when taken from the mother tree by whether there are leaf remnants on the cutting. Leaves fall off completely when going dormant. Also note the time of year for your area and the area you are buying from, especially in the fall. Colder areas can have dormancy as soon as November, but warmer areas may not have dormancy until late December or January.
☀️ Be mindful of leaf and fig stem remnants left on cuttings. This happens when the leaves and fruit did not fall off on their own, but were either cut or broken off. (Usually, this is because the tree was not yet dormant in the case of leaf stems.) They can leave a little piece behind that will eventually fall off. You do not want to store or wrap cuttings with these left on because they can cause rotting in those areas.

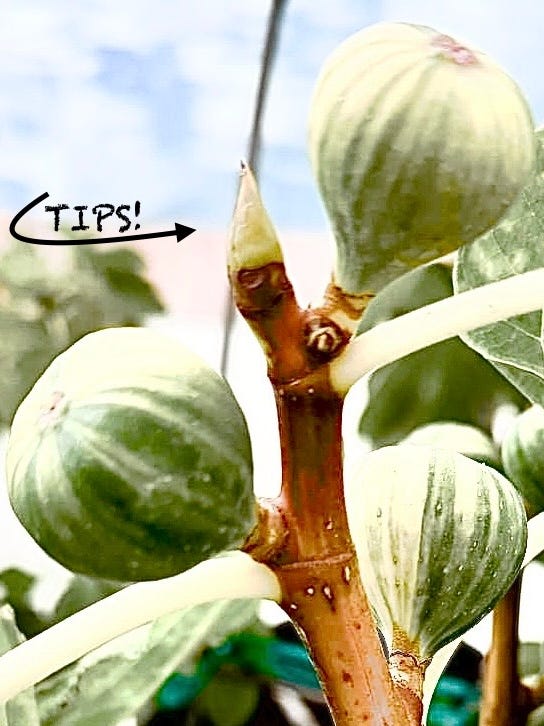
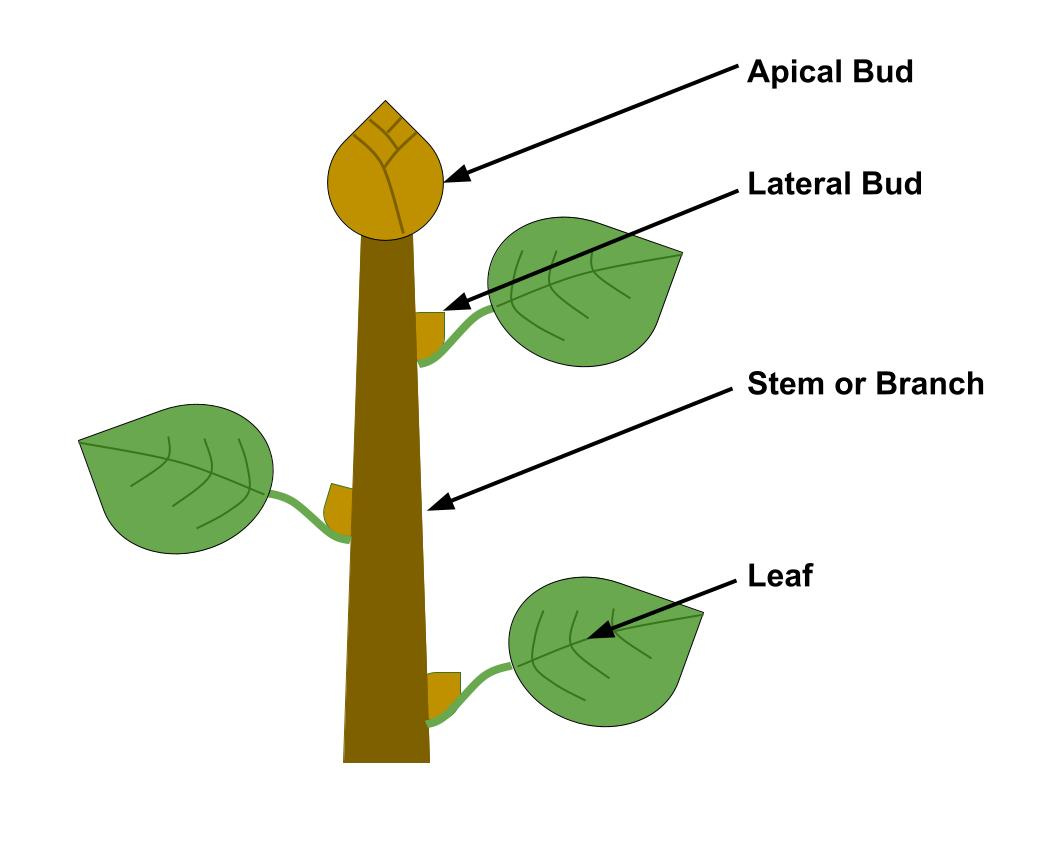
☀️ Apical bud cuttings can be more stubborn to root, as the hormones for root growth are often lower down in the branch. Cuttings where the current season’s wood (1 year old wood) joins last season’s wood (2 year old wood) has the greatest potential for root development. The base of the stem at this junction contains a large number of dormant buds that supply hormones required for developing roots. However, most growers will take cuttings from upper current season wood for the sake of their own tree and growing preferences. This is to be expected, and the majority will root even though higher than ideal.
Apical bud cuttings have the advantage of growing from the tip and forming a straight trunk right from the start, which some find desirable. There are mixed feelings on whether apical buds should be wrapped in parafilm or waxed. It’s best to experiment and see what your preference is for this.
I personally prefer cuttings below the apical bud area as I find they root easier for me. It seems to be a love/hate thing for most people. Some prefer to save apical bud pieces for grafting, and they do work well in that application.
☀️ Make sure your cuttings are not shipped in the heat of summer because they can die, especially if they sit in a hot mailbox. Only cuttings taken late fall or winter are usually dormant, depending on where they are coming from.
☀️ I typically do not sanitize my cuttings before rooting them and do not recommend it.
Whenever we are growing something, it is always in a microbial rich environment. The soil, the roots, the plants themselves—everything— are surrounded in microbes. It is what keeps all things on earth alive, for a fact, without microbes we would be dead. It is impossible to grow things in a sterile, let alone sanitized, environment. Nature will not allow it.
It isn’t opportunistic “bad” microbes causing rot. It is dead tissue that is decomposing that brings in the appropriate microbes to break down what has died to return it to the earth so to speak. So no amount of sanitizing will prevent a dead or dying cutting from rotting. Only dead tissue either on or in a cutting will cause rot.
As such, it does not make sense to me to go to lengths to sanitize a cutting with a harsh chemical when as soon as you take it out of that solution and stick it in potting mix you are going to re-surround it with other microbes. It is an exercise in futility and in the process may have weakened protective tissues.
In attempts to thoroughly sanitize, some have killed cuttings by using water that is too hot in their cleaning process. You can put micro scratches into your cuttings depending on what you use to clean, such as brushes, this can cause tissue death in those areas which can bring on rotting. Antimicrobial solutions themselves can be harsh on plant tissues leading to a certain amount of cellular death.
Because microbial balance is very important in keeping things healthy, I prefer not to remove nature’s microbes on healthy cuttings since they are essential to life & growing. I did experiment with sanitizing cuttings in the beginning. I did not find it to decrease rotting issues in comparison to not sanitizing them. So to me, it is a wasted step that invites a need for future interventions.
The only time I clean a cutting is if it is clearly dirty, or if it has some mold on it. I only use cool water, a wet paper towel to wipe with, and diluted hydrogen peroxide or colloidal silver if necessary. Soap can affect pH and outer protective barriers, so I try not to use it.
☀️ Hydration is one of the most overlooked aspects of rooting success. Hydrated cuttings root faster, which is one reason why non-dormant cuttings can be more successful at rooting. Because they have sap flow, they are hydrated.
Cuttings drying out is one cause of rooting failure, both in the rooting mix and the top part of the cutting exposed to air. Rooting mix should remain damp, but not wet. Burying the majority of the cutting helps to keep it hydrated. Using lower pH mediums like peat and coco coir, without organic matter added in, can help to prevent any mold formation on the buried part of the cutting.
Any part not buried and exposed to air should have something to help keep it from drying out & molding. This can be with a permeable grafting tape, wax, glue, pruning sealer, semigloss paint, a plastic bag or cup placed over the top, or something else used to control humidity. If you are in a humid environment, this naturally helps to prevent dry out, and something like grafting tape may be undesirable by keeping in too much moisture. However, this can be essential in a drier climate to have success.
☀️ If using candle wax or other hard wax to seal your cuttings, melt it and cool it to below 140°F to prevent damage to your cutting. Cheese wax is another type that can be used. Apparently, toilet bowl seal wax can also be used, which remains soft in a closed container, but I have not tried this personally myself yet. Apply it with a small brush or with a gloved finger. It can be messy but is reportedly successful.
☀️ Pre-soaking cuttings helps to rehydrate them and to activate all of the layers in the cutting for rooting. It can help to speed up vascular flow and the formation of rooting initials. This is a very helpful step for dormant cuttings and any that have been stored.
☀️ You can pre-root cuttings by leaving the bottoms in water, by putting the entire cutting in a plastic ziploc bag with a damp paper towel, or by putting in a bin fully covered by a lower pH inert medium such as damp but fluffy 100% coco coir or sphagnum peat moss, some prefer long fiber moss for this. This is done until lenticel cellular debris develops or roots start to form and can help with callusing and hardening of the cutting. Just note that these root intials are very tender and can be easily pulled off, so you need to be very gentle when placing them in rooting mix.
Some swear by pre-rooting, others hate it. I use pre-rooting when I intend to root soon, but don’t have time to fully process my cuttings for rooting right away and don’t want to store them in the fridge. This can hold cuttings for about a month give or take. Make sure to gently remove any fibers sticking to the cuttings before potting them.
Pre-Rooting Examples:


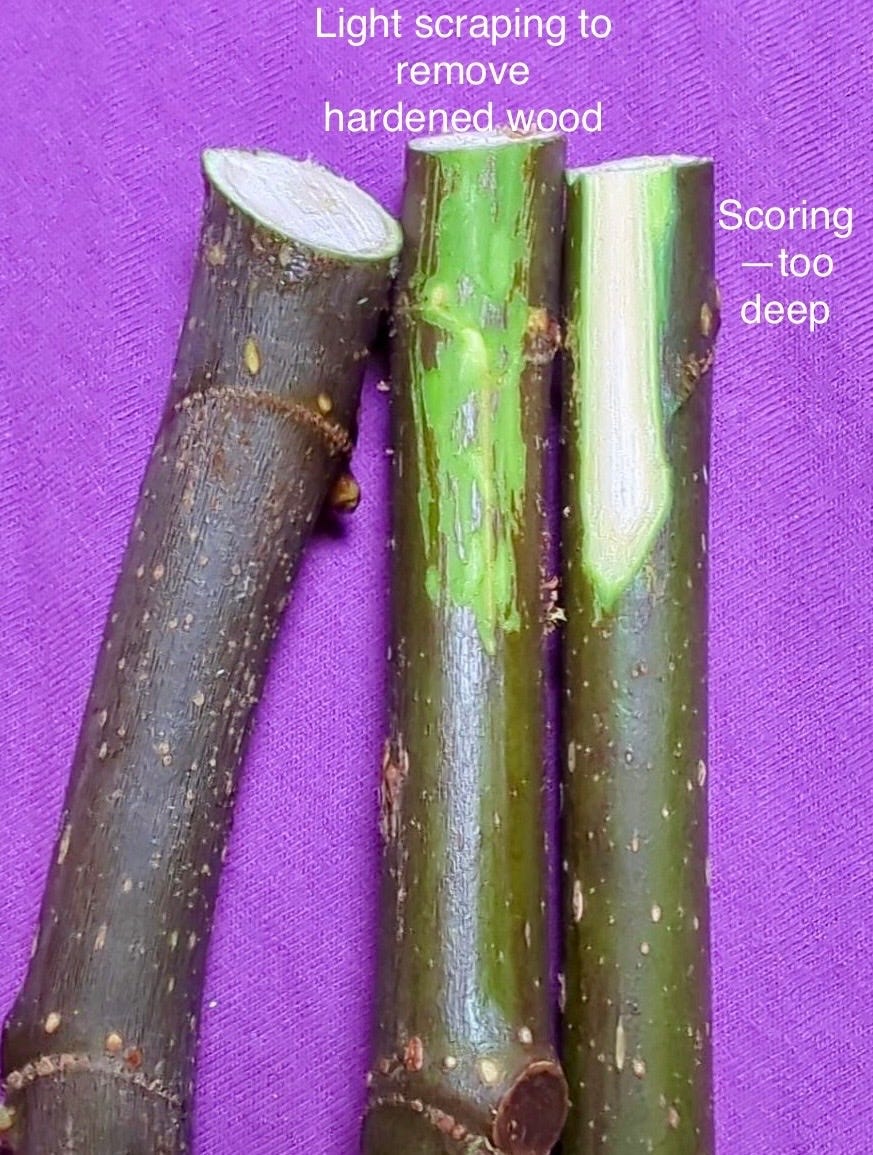
☀️ I do not score or wound my cuttings. When I tried it, I did not find it to increase success. Scoring/ wounding is recommended for difficult to root hardwood cuttings. The “wounding” should only be done deep enough to expose the light green cambium layer under the bark and not deeper than that. This is typically done on the bottom 1-inch of a cutting on one side and can help to remove a physical barrier that may be in the way of roots forming.
However, fig cuttings are not generally considered difficult to root, so this can be an unnecessary step that creates a vulnerable area. In most pictures I have seen where this was done, the roots formed around & away from the wounded area or above it, never directly where it was wounded. Some really swear by this though, so follow your own instincts. It may be more useful on older wood cuttings.
☀️ I have tried so-called natural rooting hormones: aloe vera, seaweed extract, fermented willow bark extract, saliva, honey, sugar, cinnamon, etc. I did not notice any difference in rooting with these and so I don’t bother with them anymore. But hey, they are fun to experiment with and it certainly doesn’t hurt to try them yourself!
☀️ I also do not recommend using rooting hormone in general. I have found it to cause more death after initial rooting than without it. However, it can be useful to try if you’ve had a hard time rooting a particular variety. Only use liquid hormone, do not use powders or gels which generally cause more issue with rot.
Okay, so those are my random tips on cuttings. I hope they help in your rooting adventures!

These are the best practices. Showing us , not telling us , and we love it!