

End Of Season Fruit — Let Them… Ferment? Oh Yeah, Baby! (This is the one all about FPJ)
Got of lot of produce that won’t ripen in time? How can we put them to good use? How to make a fantastic all-purpose fertilizer that doesn't stink? KNF Fermented Plant Juice is your solution...

The season is winding down, we’re in fall, and there is all of this lingering produce in the garden and on the trees. They aren’t properly ripened and so they’re not enjoyable to eat. What can we do with them? Do we just chuck them? Compost them? Throw them away?
Or what about that variety we just really don’t care for that has all of this fruit on it? Breba with zero flavor? Stringy squashes?
I’m glad you asked, friend! Here is what to do: Fermented Plant Juice (FPJ).

The way nature feeds itself is by causing excess, damaged, or old to drop onto the ground around the plant or tree, all the microbes and bugs break down this material, and the matter is incorporated into the dirt to make fertile soil. (You all know this as we’ve talked about it before, this is for the new people.) This adds back all of the minerals needed, it incorporates enzymes, proteins, and carbon matter, and it builds up microbial colonies that plants need for food and communication. This is also how nature propagates itself. It allows seeds to take root in a nutritious, microbial-rich environment so that the plant system goes on.
How does this translate to the modern gardener though?
It’s one thing to have plants sprouting up in the wild, another thing to have tons of volunteers in your own garden. I hear you on that! Some are into wild gardening, self-seeding, landraces, and what not; others like it more organized and contained. Here’s what you can do if you’re the latter:
Return all plant matter to the soil when growing in-ground, (not with fertilized seeds if avoiding volunteers.) ◦ For annuals: Leave the roots in the ground. Cut the upper part of the plant down and into pieces if you can, mix it a bit into the soil, and top it with some additional soil, compost, or wood chips if you like. ◦ For perennials: Leave any leaf litter and fruit on the ground around the plant. Everything will break down by spring and you will have more fertile ground for your next season.
Make fermented plant extracts. There are many ways of doing this. You can read about JADAM Liquid Fertilizer here, which is one method. Another method is from Korean Natural Farming (KNF) and is called Fermented Plant Juice (FPJ) when using leafy material, flower buds, or immature fruits and Fermented Fruit Juice (FFJ) when using ripe fruits. FPJ typically is used during vegetative growth stages and FFJ is used during fruit production stages. This allows you to create a liquid fertilizer that returns nutrients to the plants without having it break down in your pots or around your plants.
(Note I will just use “FPJ” in this article referencing both for simplicity.)

Why should you use FPJ?
It is super easy and quick to make — it’s ready in one week!
It’s almost free, the only thing purchased is brown sugar, so it is very low-cost.
It is low to no odor, unlike JLF, and can be used indoors, outdoors, or in foliar sprays.
It can be made at any time throughout the season.
It is shelf-stable and can last a long time.
It has a high dilution, so a little goes a long way.
It can be made at any scale, small to large, indoors.
You can use almost anything that grows in your yard to make it.
Plants love this stuff! It is loaded with nutrients and good biology.
According to the University of Hawaii, “The brown sugar draws the juices out of the plant material via osmosis and also serves as a food source for the microbes carrying out the fermentation process. The weak alcohol produced during fermentation extracts chlorophyll (soluble in ethanol) and other plant components. It is non-toxic and edible.”
FPJ becomes liquid gold in that it is rich and teeming with nutrients and minerals. It is used diluted as seed and soil treatments and for plant nutrition. Because it is a lactic acid bacterial ferment, it can be used like other LAB products in the garden and around the yard. You can use leafy weeds in your yard to make a mineral-rich fertilizer. Dandelions, nettles, comfrey, and more are great for this! You can also use any fresh, green leaf matter, flowers, buds, vegetables, or fruit from your garden to make a plant-specific fertilizer.
Usually, a specific plant is used in FPJ for fertilizing that same exact type of plant. So FPJ made from tomatoes would be used for fertilizing tomato or other nightshade family plants. Blueberry FPJ is used to fertilize blueberry or other berry plants. FPJ made from figs is used to fertilize figs or other fruit trees. Some can have more crossover with all plants, such as FPJ from weeds, squash, melons, berries, or tree fruits, but nightshade FPJ should only be used with its own type. (Nightshades being tomatoes, peppers, potatoes, etc.) FPJ from citrus or grapes should only be used on their respective plants as well. This is because these plants have compounds that inhibit the growth of other plants but work perfectly fine on their own type.
For most fruiting trees and plants, you generally just use the fruit to make FPJ. However, with figs, you can use either the leaves or the fruits. Other plants with good leafy or flower material in addition to fruit can be used similarly when it doesn't inhibit growth or production.
FPJ is almost like homeopathy for plants in that it uses very small doses with mineral traces but brings big benefits. It starts at dilution rates of 1:1000 or 1:500. One tablespoon of fermented plant juice added to 4 gallons of water is a 1:1000 ratio, two tablespoons a 1:500 ratio. So if you make 1 quart of FPJ and dilute it at the 1:500 ratio, that will make you 500 quarts or 125 gallons of amendment.
The recipe can be scaled to any volume, small or large. It is used large scale on farms in Hawaii and other places. It all comes down to how much brown sugar you wish to buy and how much plant material you have available for it. There are some great YouTube videos by Chris Trump showing KNF amendments on a larger scale if this is something that interests you. Or, you can just have a small pint jar amount that you use only for starting seeds or cuttings. It’s all up to you.
For myself, I get 7.5 lbs of organic brown sugar from Costco and am able to make a bucket full of amendment for about $8. This lasts throughout the entire season for all of my fig trees. I use tomato FPJ for seed starting my tomato plants. It’s great for a seed soak and for fertilizing while they are growing indoors. I use fig FPJ in a soak for starting my cuttings and to fertilize them while growing indoors as well. I also use it in my foliar sprays throughout the growing season outdoors.
Principles of collection
According to traditional KNF, you should collect the plant material you will use for FPJ at dawn*, before the sun is up, as this is when plant leaves and fruits have the most energy in them. This is because during the day, photosynthesis and transpiration are causing a lot of flow throughout the plant, moving nutrients and water all around. The plant stores and deposits this collected energy during the night. So at sunrise, we are getting plant material with the highest deposits of photosynthates and minerals stored in them. Plus, doing it then can bring a bit of a spiritual connection to your growing as well, which adds another dimension to it all. There are insightful moments to be had at dawn when you’re out there in the waning quiet of the night, watching the sun come up, alone with your thoughts, … (And looking out for snakes, black widows, scorpians, and other large creepy crawlies humans aren’t meant to be eye to eye with. 😱 That fear definitely brings out the spiritual side of things for some! 😜)
Lactic acid bacteria and yeasts are populated on the outside of the plant material. FPJ utilizes these surface microbial populations to carry out the fermentation process. If this is removed, it may not ferment properly or produce as much plant juice. So we do not want to wash the plant material and avoid collecting it after a rainfall. Ideally, wait at least two sunny days before collecting after a rain.
This process requires fresh materials with water content, so dehydrated, crispy, or fibrous, woody things cannot be used for FPJ. If it’s something you could juice, then it likely will work. You can use overripe, underripe, damaged or bug-eaten plant matter as long as it is fresh from the plant. Flowers and flower buds can also be used. Do not use anything that is moldy or spoiled as it can affect the microbes that are cultivated.
The stage of growth the plant matter is collected at will affect the type of nutrients present and when used, is applied in the corresponding stages on plants; i.e. young, green, and fast growth material is used for fertilizing vegetative growth, ripe fruits are used for fertilizing during fruiting stages, and so on.
If we are being very technical to KNF standards, then only young growth would be used from vigorous, fast-growing, healthy plants. It is these that would be at the height of nutrition and hormone levels. However, sometimes we need to start where we need to start, which in some cases is less than ideal vigor or health, but it still will provide benefit that will build up plant health, particularly in the microbial aspect.
It goes without saying, do not use poisonous plants.
* Confession: I do not get mine at the crack of dawn. I’m an insomniac with a job. But that is ideal if you can do it.
What do you need to make it?
Brown sugar of equal weight to your plant material, plus a little extra for the top. Other natural, unrefined sugars can be used like panela or jaggery. (Do not use liquid sweeteners like molasses, maple syrup, or honey; do not use white, refined, or bleached sugar.)
A scale to weigh your plant material and brown sugar.
A jar, pail, or other container to ferment in. Avoid metal containers which can react with the solution. Use glass or food-grade plastic.
A clean cloth,(like a tea towel, a cotton t-shirt, or muslin,) or a paper towel large enough to completely cover the top of your container; and a rubber band or string to hold it in place.
Freshly collected fruit, vegetables, leaves, or flowers straight from the plant chopped into approximately 1-3 inch pieces or smaller. Smaller pieces will break down faster. Do not wash the plant material! (Juicier plant material can be larger and will break down faster; dryer or dense plant material should be smaller and more finely chopped.)
How to do it?
(This fermentation method is similar to sauerkraut, except that it uses a quantity of brown sugar instead of salt.)
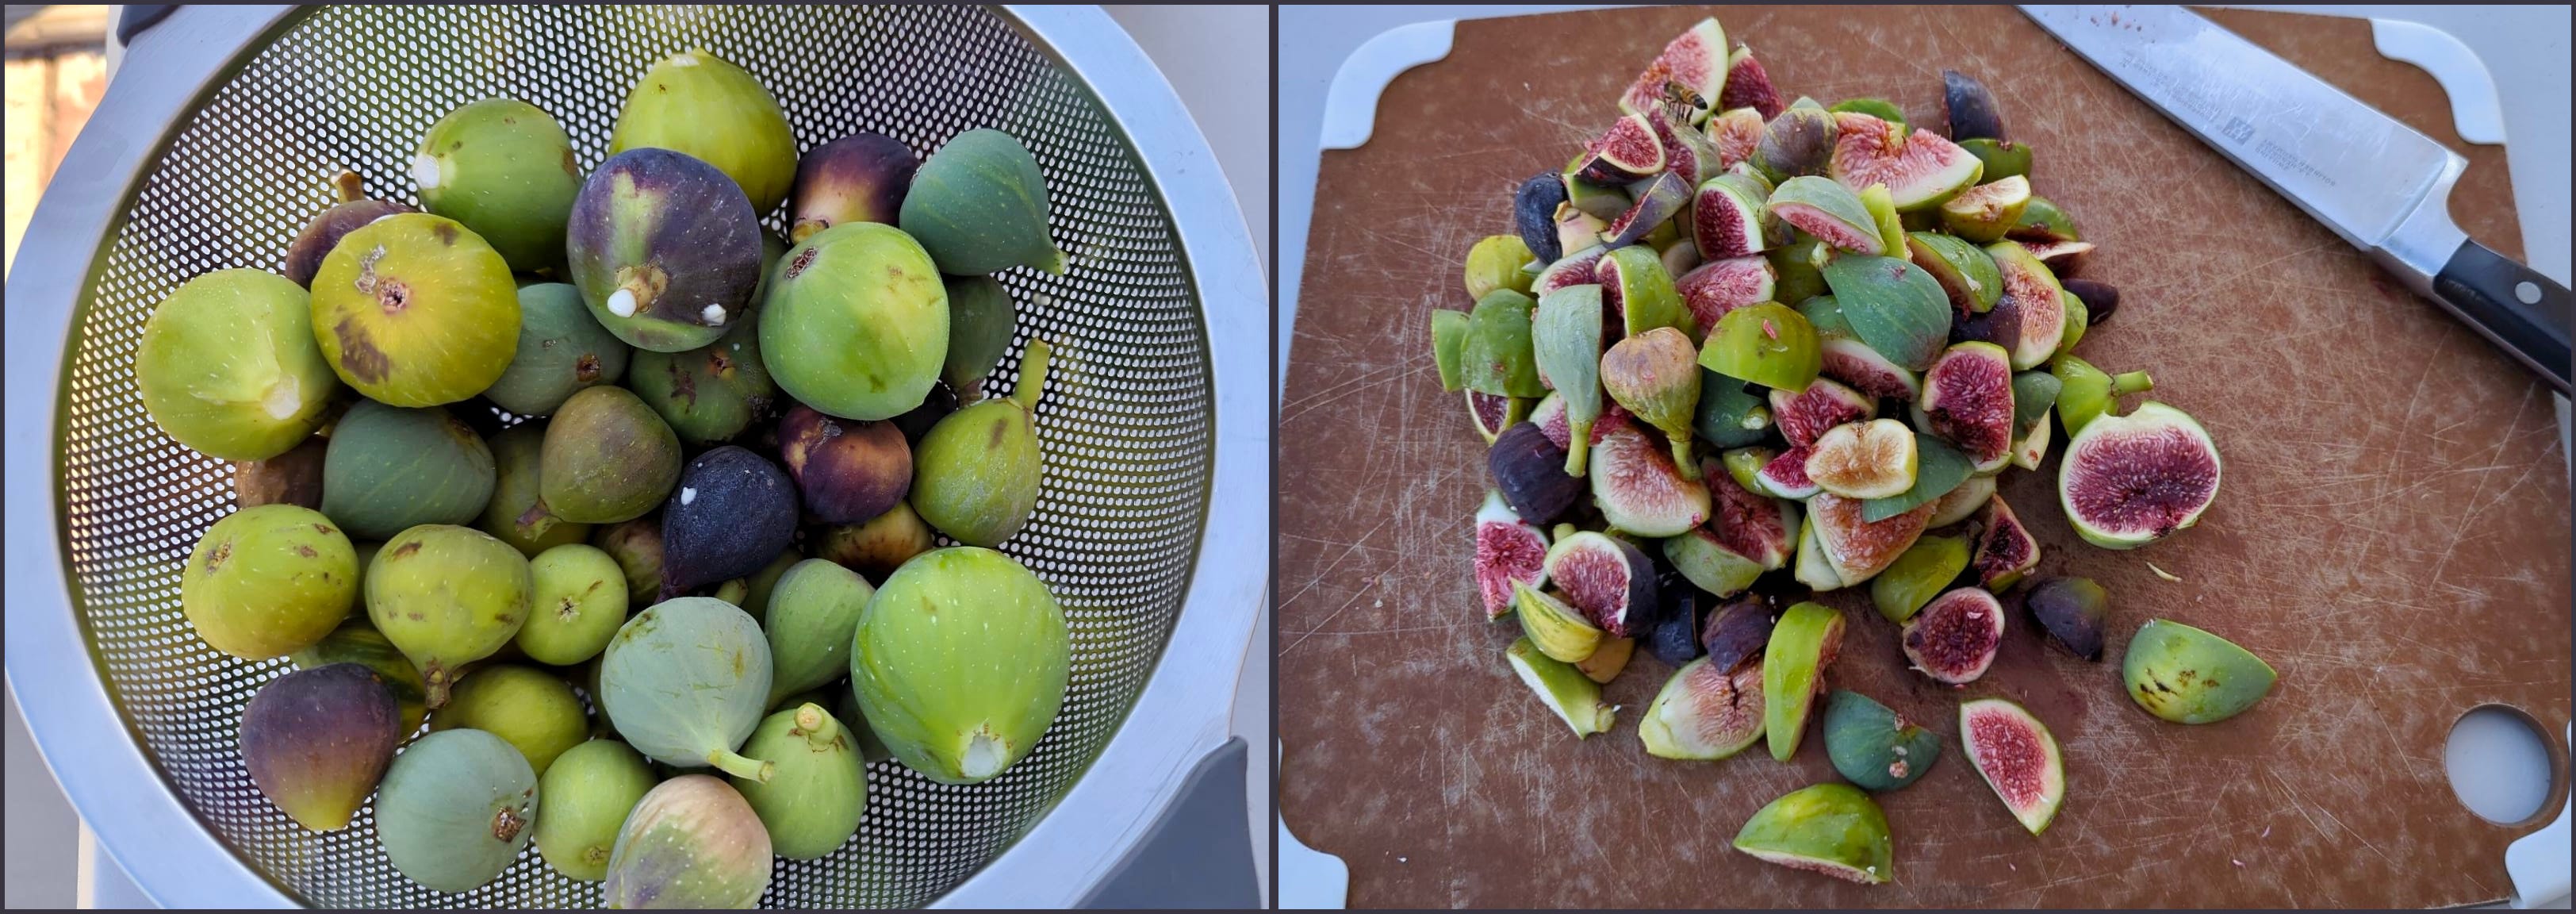
Step 1: Gather and cut plant material. Collect your plant materials first thing in the morning while dew is still on them. Cut up the material into approximately 1 to 3-inch-sized pieces. Anything whole, like a fruit or bud, needs to be cut open. A blender or food processor can also be used.
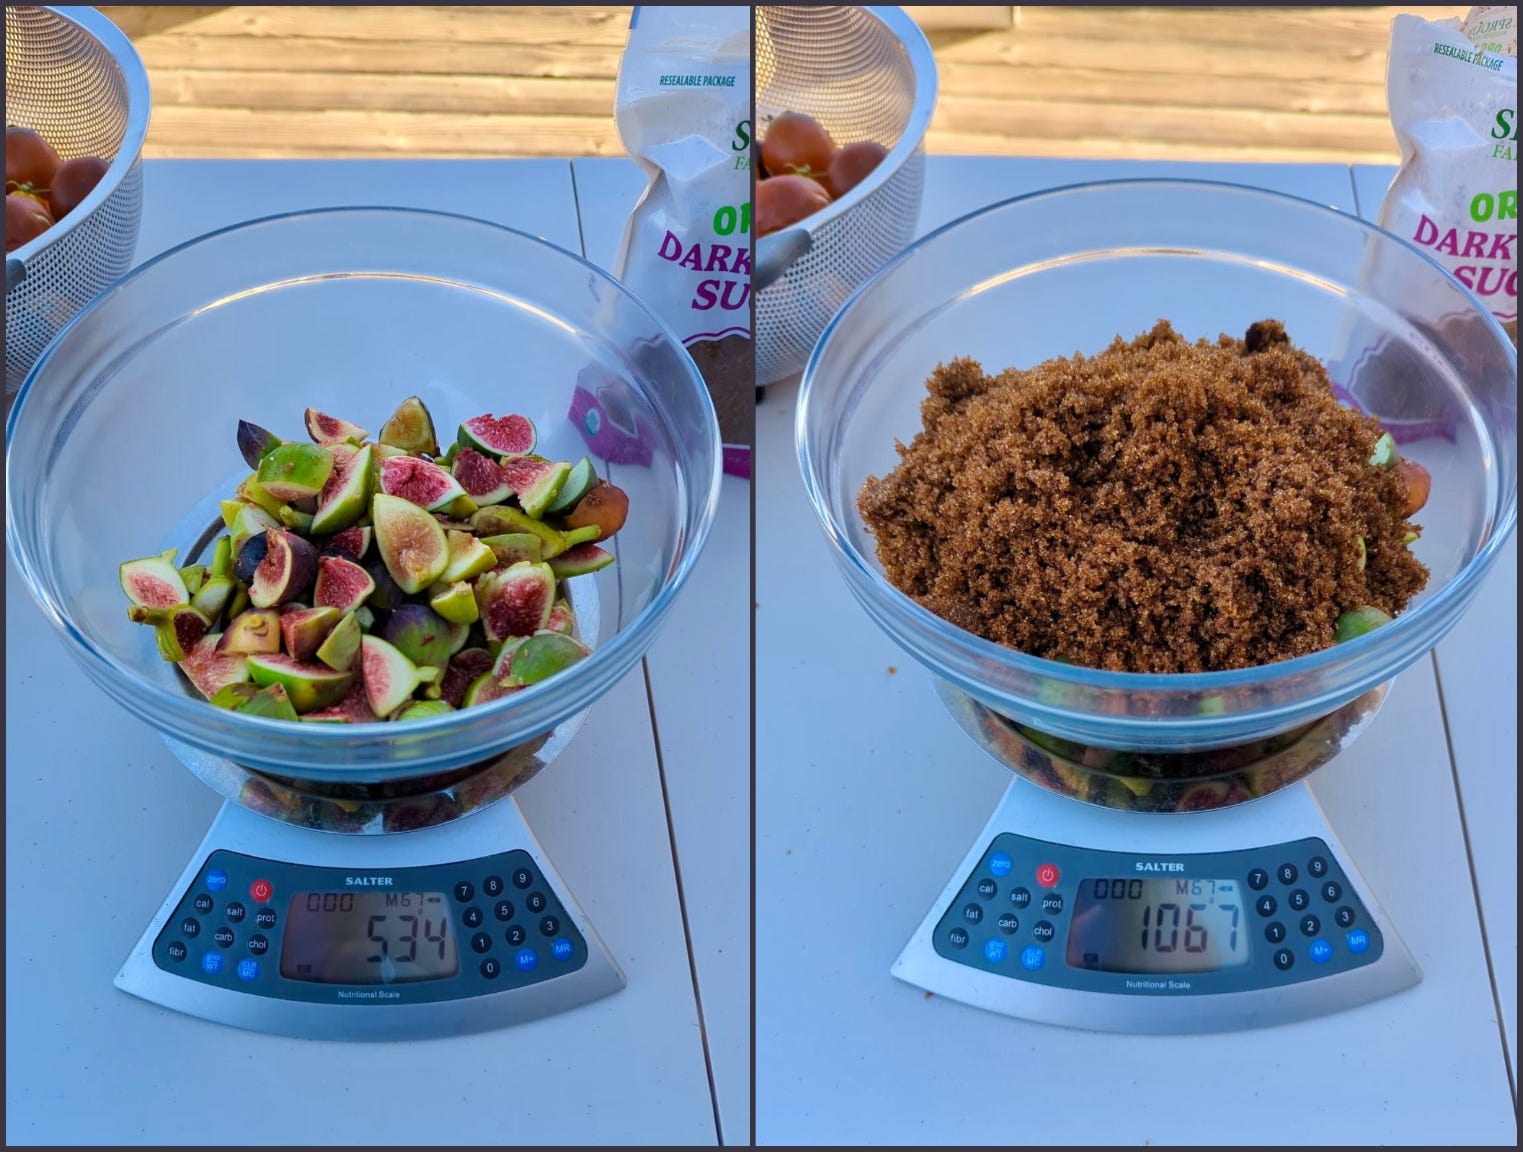
Step 2: Mix plant material with brown sugar in a 1:1 ratio. Weigh your plant material and thoroughly mix it with an equal weight of brown sugar in a bowl. Make sure all plant surfaces are covered with sugar to the degree possible to start the osmotic process.
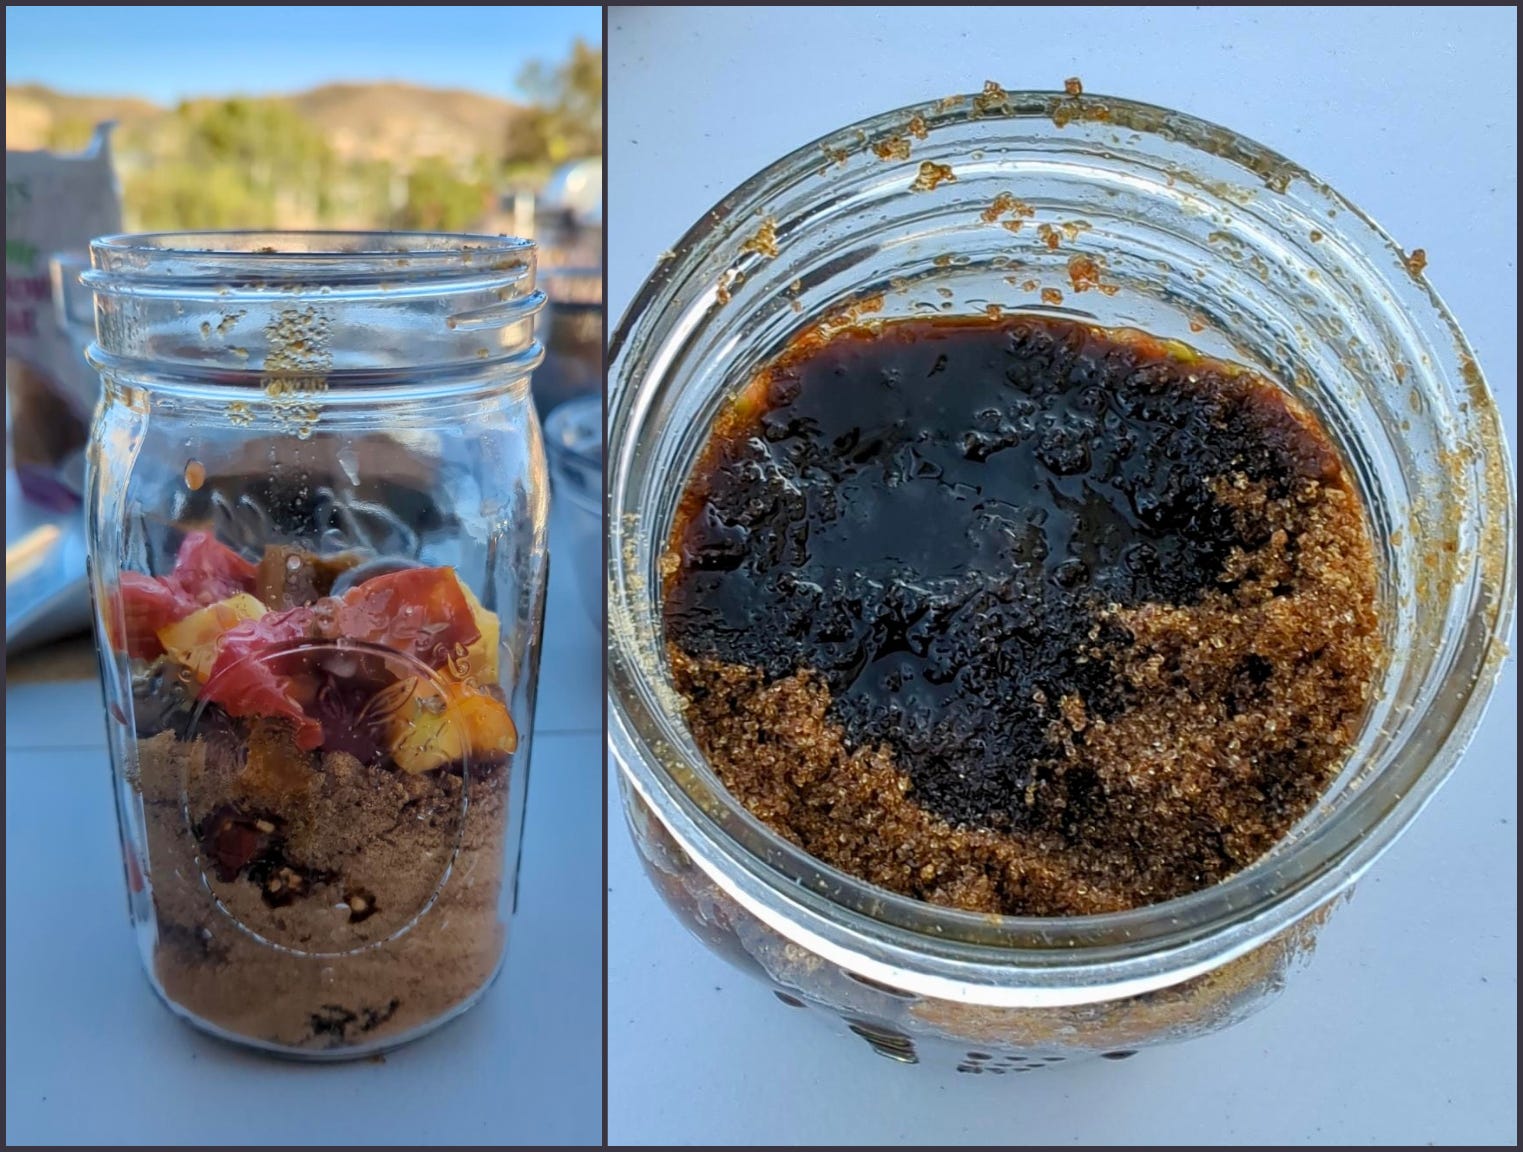
Step 3: Fill your container tightly to slightly over ⅔ full. Add the mixed plant material and brown sugar into the container you will use to ferment in. Press and pack the material down into the jar to remove air pockets. Top with an extra layer of brown sugar to help keep everything submerged and below the sugar.
The volume in the container should be approximately ⅔ full throughout the ferment. The volume will go down a certain amount in the first day depending on the type of plant material used. So you may want to overfill to ¾ or to the top when using fluffier or chunky plant material. Ripe fruits usually become syrupy almost immediately and should not fill the container more than ⅔ from the start depending on particle size, ¾ max if there are large chunks. (More on this in step 6.)
☇ Note: For denser or less juicy plant materials, it can be helpful to add a weight at the top, such as a rock or glass of water. (Avoid plastic or metal weights.) This will help to facilitate osmotic pressure to release the plant juices.
Step 4: Clean up the outside of the container. Wipe off the outside of your fermentation container with apple cider vinegar to remove any sugar residue to avoid attracting insects.
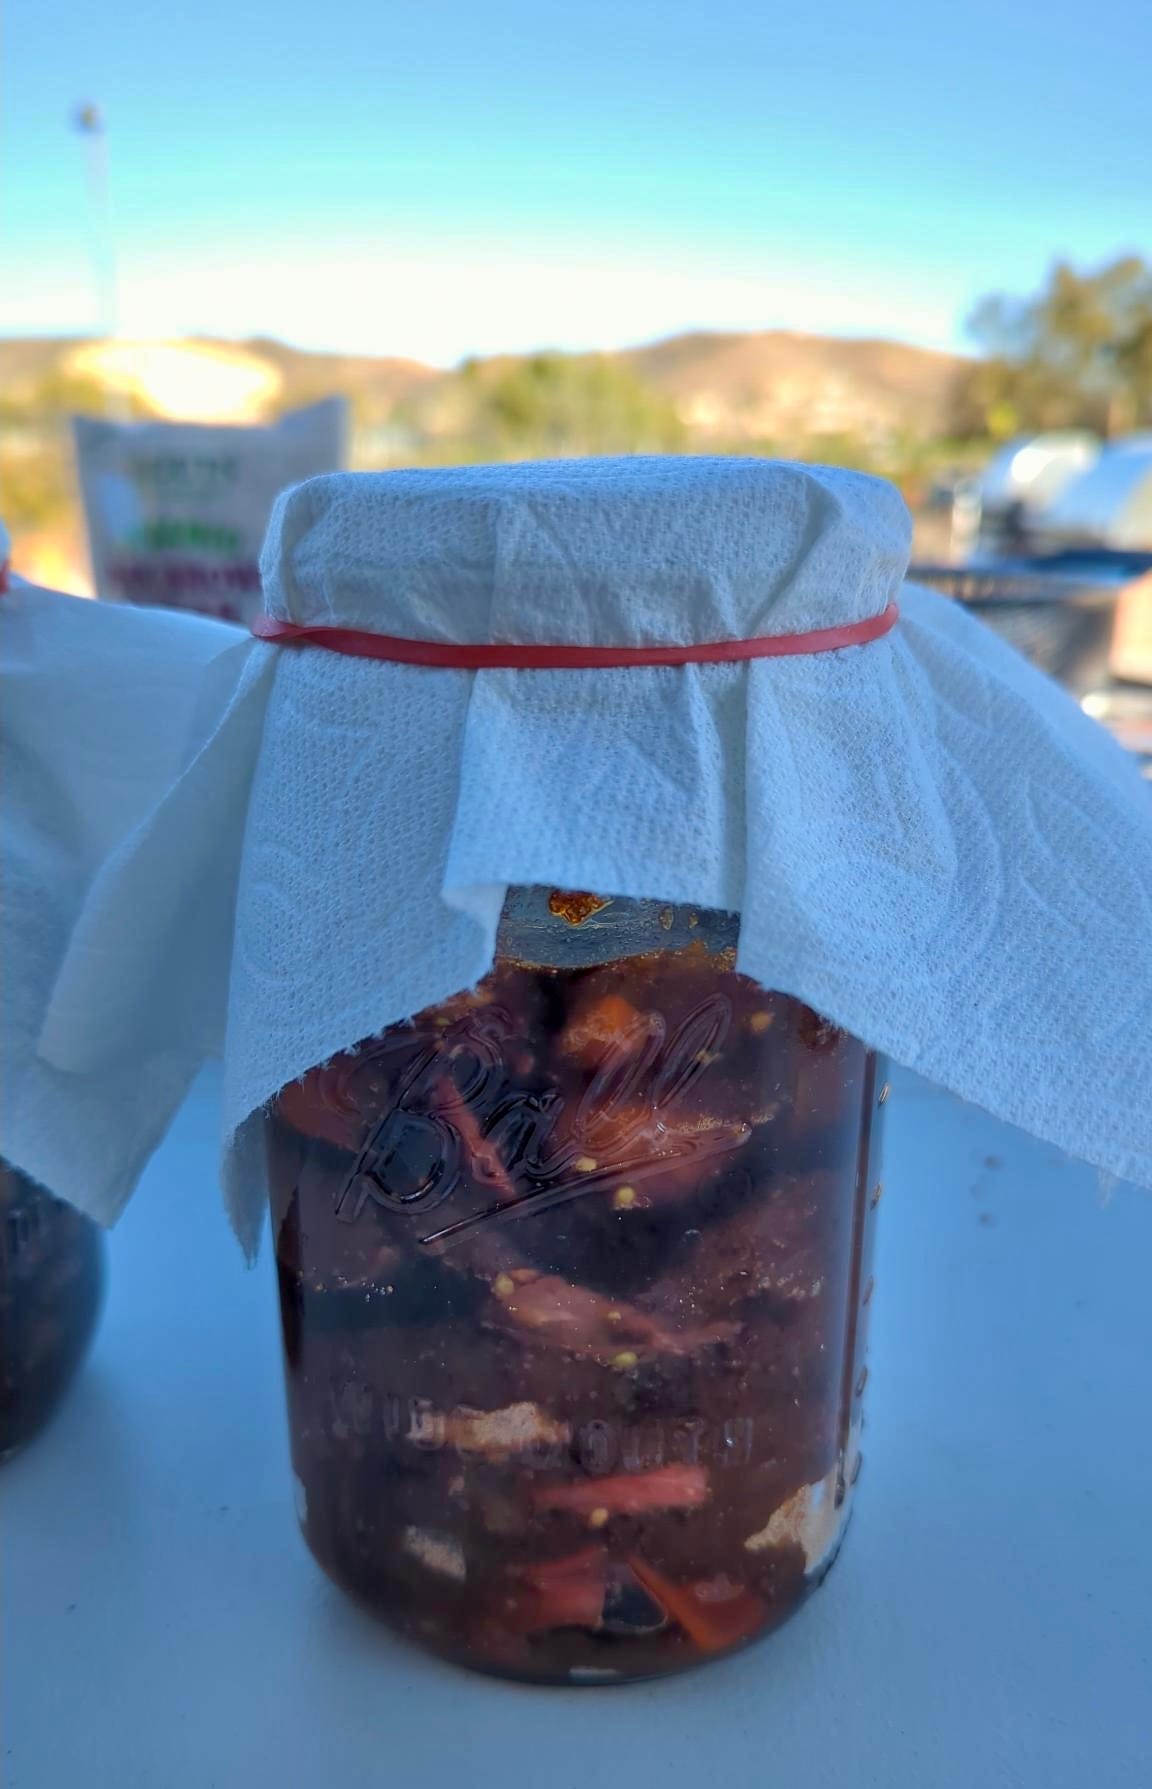
Step 5: Cover with a cloth and secure it. Cover your fermentation container with a cloth and use a rubber band or string to keep it attached. This is to keep out insects and any other debris as it ferments while also allowing gases to escape. Paper towels should be replaced if they become wet or torn.
Step 6: Check after 24 hours and then let ferment undisturbed for one week. Leave the covered container in a spot out of light at room temperature for about a week. Liquid should start to form within the first day. Check after 24 hours to make sure that all materials are remaining submerged and that granulated sugar isn’t collecting at the bottom undissolved. If it is, give it a stir.
In order for the fermentation process to occur properly, the volume of the plant material and brown sugar mixture should settle to ⅔ of the container after 24 hours. If the container is too full, the microbes will not have enough air to properly ferment. Either remove some of the plant material until the container is no more than ⅔ full or change it to a larger container. If the container is less than ⅔ full, add more of the mixture to prevent mold growth, or change to a smaller container. The ⅔ is not an exact or hard rule, it can fudge a little, but is something to be aware of in case you have any issues.
Not all plants will settle in the same way, so it is good to check and adjust the volume after the first 24 hours. You will notice more of a difference when using leafy materials as opposed to juicy fruits which tend to break down almost immediately.
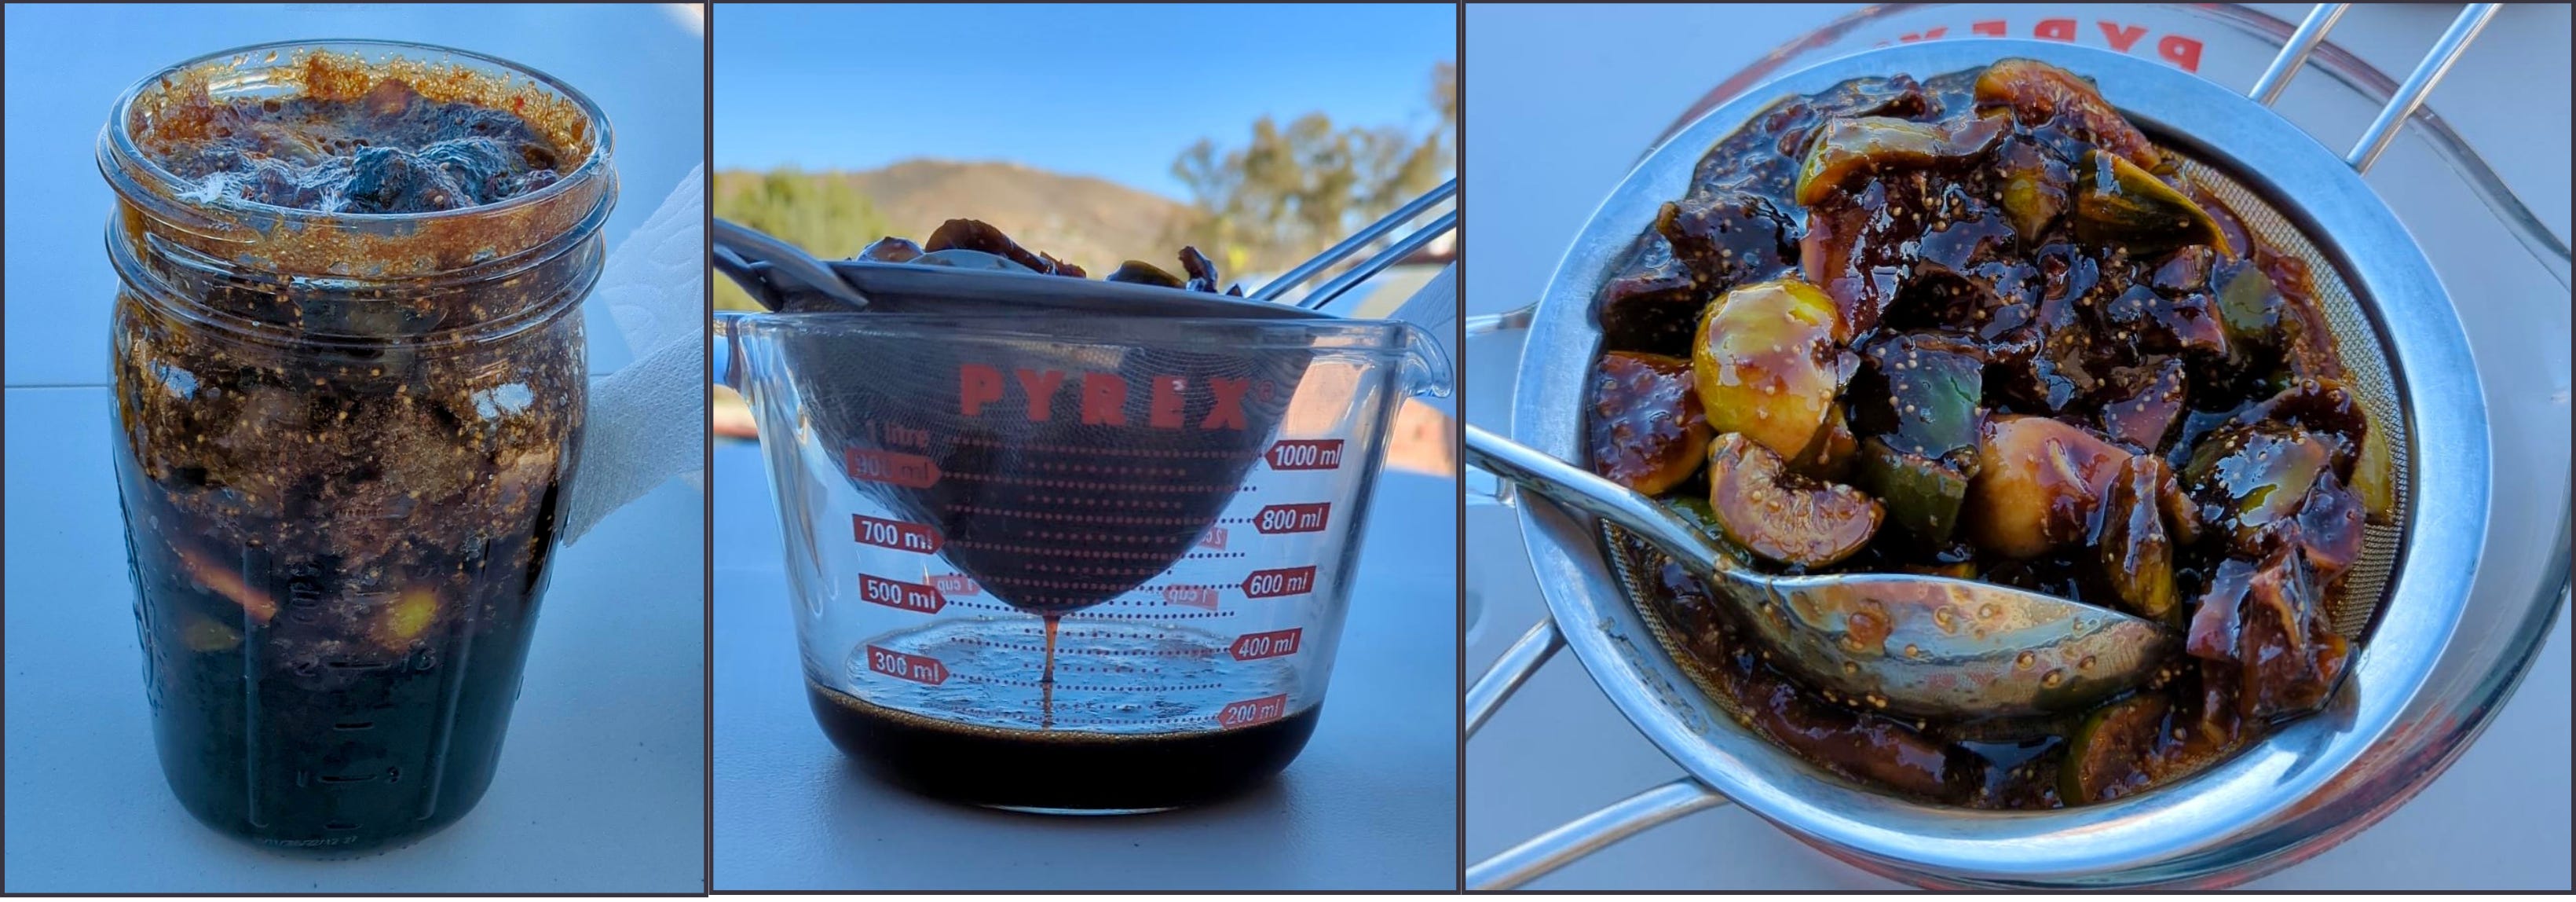
It is okay if it goes a little longer than one week, but eventually it will turn into something else that may not be as desirable or useful. Warmer weather will speed things up (3-5 days), cooler weather will slow it down (7-10 days). The average fermentation time is 5-7 days. When it is done, the plant solids will float to the top and the liquid will be separated below it. The end product should smell unique but not off-putting.
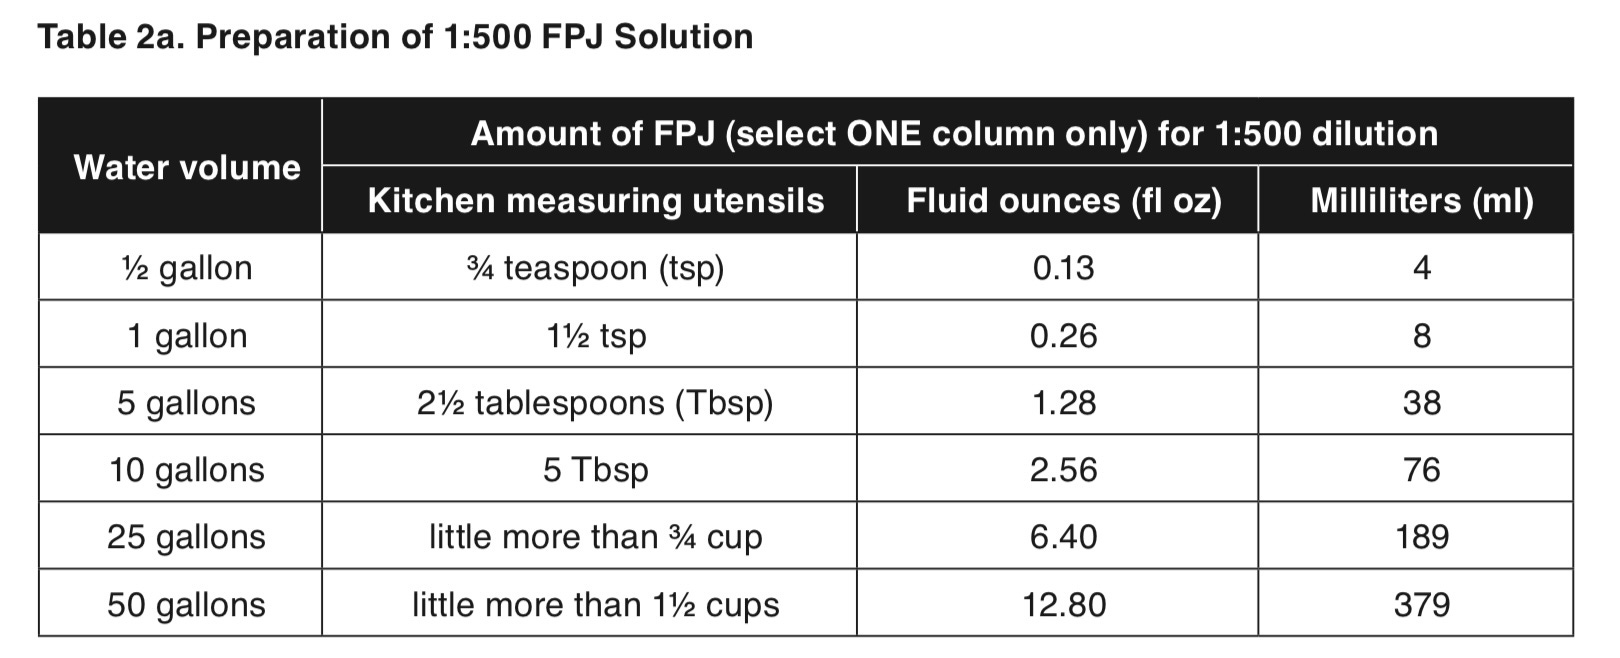
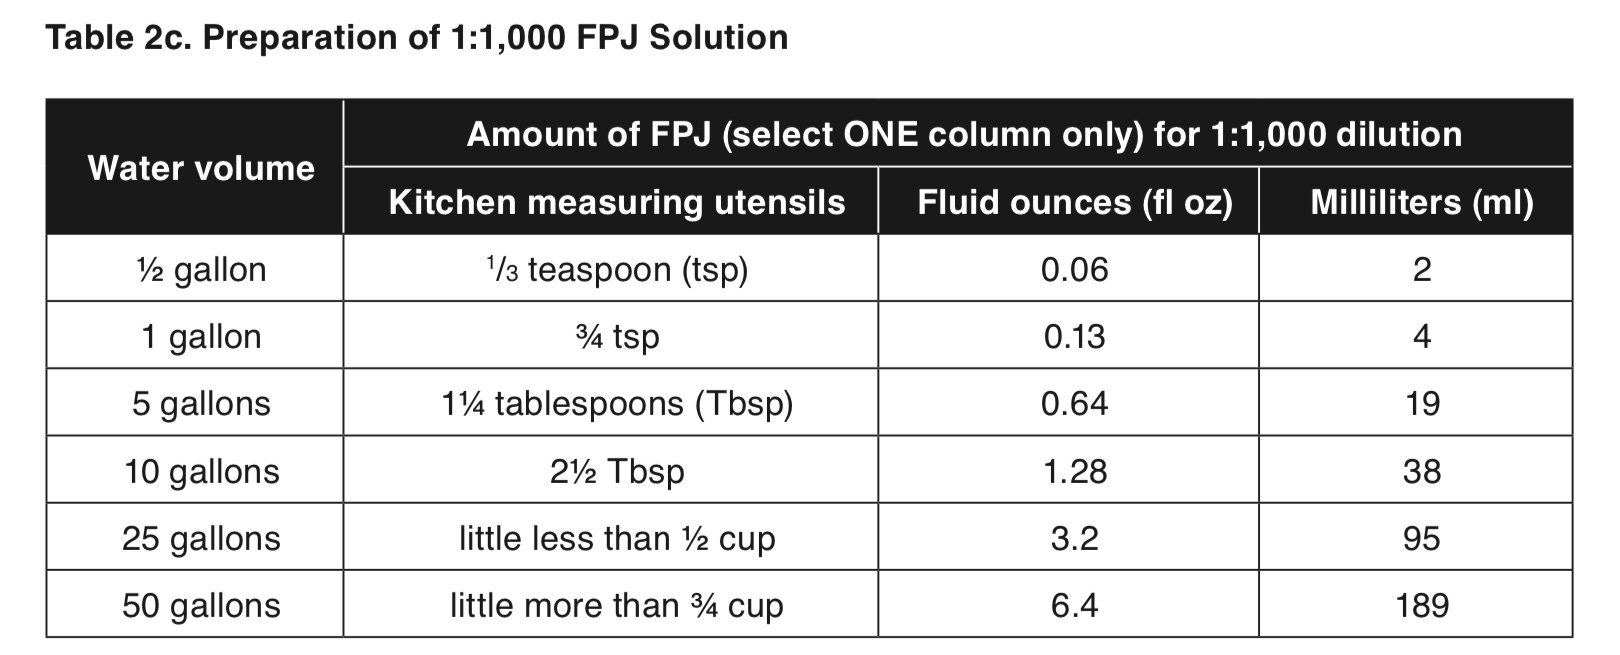
Step 7: Separate the liquid from the solids and store. Strain and drain the liquid into another container using a funnel and mesh sieve or a layered cheesecloth. This can happen quickly or may take several hours depending on the viscosity of the fluid. The amount of liquid produced will vary by the amount of moisture that was in the plant material.
Store the liquid in a jar with a loose lid. Note that the solution is alive and may continue to produce gases. In such a case, do not use a tight lid as the container can explode. (I technically have never had this happen and have used tight lids. But because this is the internet, that realistic warning needs to be there just in case. All it takes is one time and I value your eyeballs. 👀)
If the liquid should start to foam in storage, add more brown sugar to eliminate it. If you see mold, skim it off and add more brown sugar.

Discard, compost, or further extract the solids. Plant material that is higher in minerals, such as weeds, can be further extracted with vinegar using the method discussed in this article.
Application: Apply once per week as a foliar spray or watered into the soil. Dilution is typically 1:500 to 1:1000. A higher dilution should be used when mixing a cocktail of inputs together or when using on very young plants.
Here are some videos if you need more of a visual for how to make FPJ or FFJ:
↑ One of my gardening heroes and has other videos on his channel discussing the use of FPJ. He does more of a layered style here with the plant material and brown sugar. But mixing it a little longer until you start to feel some moisture release is ideal and the sugar will stay put a little better.
↑ The OG of KNF YouTube videos! This is how it’s done.
↑ A good video on FFJ. I disagree with his use of white sugar, brown sugar has more nutrients and plant benefits, ultimately use what you have access to. His other points are sound though.
↑ In Spanish, but uses figs so I had to share it of course! You can see how pasty and broken down they become immediately, unlike FPJs with leaves. Make sure to leave a gap at the top of the jar with this one, it will rise!
There are a ton of videos on YouTube of people making FPJ/FFJ or variations of it. Of course, I recommend binging them if you like all in the name of research! 😉
So… There you go! Doing as nature does, except indoors and with fewer insects. I hope you all try this, it is a fantastic input for plants. It encourages the biology needed and is a full-circle product. Have you ever made FPJ before? What do you think of it??

Thanks for a great article!
Mike, if you put it into a closed system to ferment (keep out the fruit flies, etc) until the sugars are mostly gone, the yeast and alcohol and time will break down most of the pests that might have made it into your brew. It's not the same as letting it sit in the garden to rot - which, IMO, is indeed not a good idea.
Most extension pest management experts will say to clean up your dropped fruit and clear your vegetable garden to avoid harboring pests that overwinter.
How does your advice to leave everything jive with that advice?